
Hey there 👋Femi here from the Technical Support Engineering team!
We get some questions about using Custom Actions with Custom Objects and Workflows, here’s how to do that.
Let’s start by taking a look at what my custom API response to the /products endpoint of my test API looks like 👇 This is important as the request and response type will determine how you structure the Custom Action request.

Now that we know what the response looks like, let’s go ahead and set up our Custom Action.
First, navigate to Settings and go to Apps & Integrations where you’ll find “Custom Actions”:

This is where you'll set up all the different connections you have to external data (e.g. Shopify, Salesforce, etc.) depending on your use case. In this post, I’ll be making use of my custom online store that sells football boots.
Click “Create action” to set up your first Custom Action:

Give your Custom Action a clear description 👇

Configure the Request details: This is where you’ll need to enter the API URL to the 3rd party system you’re connecting to.

Mine is a simple GET request to my API endpoint. Once done, you can click on the Next button.
This is where we test the request that we have just configured to make sure it all works 👇Click on the Test request button

We get a 200 OK response with the data from the API, looks like we’re ready to go!

Click on the Next button again and this is the important bit, the Response mapping, this step is optional but it’s important if you want to use the data in your Workflows, particularly for GET requests. It tells the action where to store this information in Intercom so that it can be given to customers in your Workflows as answers to their questions.

Now we map the response data to a Custom Object data - what is that?
Custom Objects allow you to extend Intercom's standard People and Conversation object data to store data that represents your business in a more flexible way.
First step is to save our Custom Action and then Create a Custom Object data
To get started, go to Settings > workspace data > Custom object data.

Create your first Custom Object by clicking on “Create new object”. Give the object a name (e.g. Boots CO to represent Boots Custom Objects since that’s what my fictional store sells) and then click “Save”.

This creates a new parent object with some recommended default attributes that track some data that are important when using Custom Actions:
- ‘external_id’
- ‘external_created_at’
- ‘external_updated_at’
Once done, we can create attributes that match up to the response of the API. I’ll not include ID since the external_id comes as a default attribute.
Next we add all of our attributes and map them to the response that correlates, then include a reference to Conversations which will allow us to create connections between our Custom Object and the conversation to power the workflow 👇

I also toggled the option to “Allow referencing multiple Conversations” - we talk about this in our article on Setting up references with Custom Objects. The gist of it is that multiple Conversations can happen about different Boots. Here’s what the finished Custom Object data looks like 👇

What we’ll do next is create conversation data where we want to store the boots we’re showing them and the one the customer is deciding to chat about.
First we’ll create Conversation data with the format Reference and select the Boots CO Custom Object for the whole inventory that we’re showing, we’ll also toggle the “Allow referencing multiple Boots CO”. This is because this is a many - to - many relationship. 👇

Next, we’ll create another conversation attribute to hold the particular boot that they have decided to chat to us about in the same way we created the first one. I’m naming this “Selected Boot”.
This time around the “Allow multiple referencing BO will be turned off since this is to highlight just one particular boot.

Once done, we can go ahead and Save everything, then head on back to the Custom Action to finish the Response mapping.
First we map the Intercom Object of the “Boots CO” to the API object that’s returned, in this case it’s an Array of Products.
Then we match each attribute that we have created in the Custom Object to a matching attribute from the API response. Once done, we select the reference from either People or Conversations to the Boots CO.
Once completed, here’s what it should look like 👇

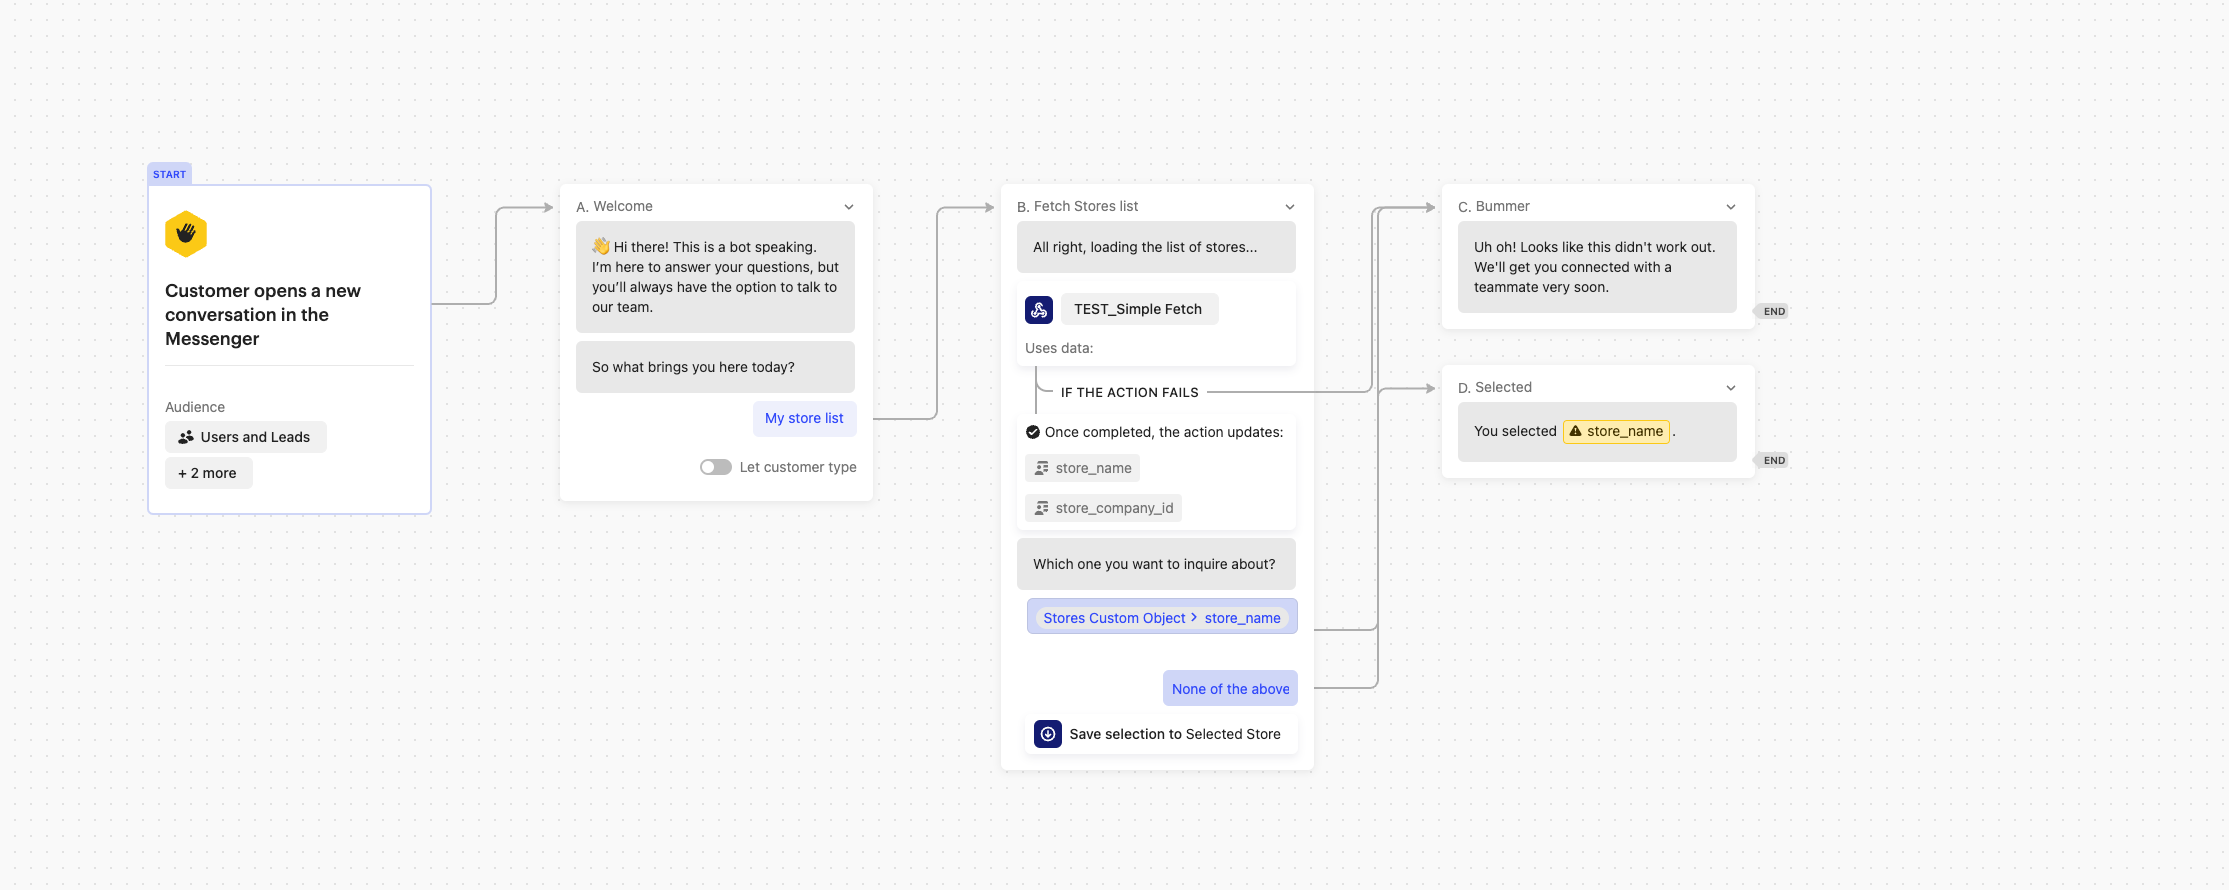
That’s it, your very first Custom Action with Custom Object and conversation references. Next we build out the Automation (Workflow) where we can have this interact with customers.
Here’s what my workflow looks like and how to add the Custom Action 👇

Click on Select the Custom Action and select Boots

Once done, add the message for if the Custom Action fails and then add the Buttons from Custom Objects as the next step under the Custom Action 👇

Click on Select data and you can configure the button that shows up 👇

Click on Add condition to select the "Conversation > Boots data for Conversation from context” option 👇

We’re selecting this because this is where we mapped our data to in the configuration of the Custom Object and Conversation attribute.
Once done, you can select the number of buttons (boots in this case) that you want to show to the customer and what attribute the button should show 👇

Save and close that once you’ve selected your options, then enter None of the above (or if you have something else you want to link to, you can use this button to connect to another path).
Click on Save selection to and then click on the Selected Boot conversation data (remember, we named the other conversation data this to track the particular boot the customer wanted to chat about.)

I connected the buttons to other paths to get the data. You can click on the {..} to select the attributes and the scroll down the list until you get the Conversation > Selected Boot (Boot CO) options and structure the message however you want it 👇


Completed Workflow 👇

Here’s what a Preview conversation of the workflow looks like


You can see the details saved to the conversation attributes, both for the Boots data and for the Selected boot

Selected Boot 👇