So firstly here's a quick overview of APIs. I'm no expert and have just learned them recently, so I'll just explain in my own understanding.
At it's simplest form APIs just let you send or receive information from an app. It's how Zapier connects with all the apps it does, as well as other applications.
The most common type of API structure is a REST API which is what Intercom uses and what most things you'll encounter will use, but there are some that use GraphQL that are a bit more complex (but more powerful).
The main two types of 'requests' are GET and POST, which mean the following:
GET - Give me information
POST - Here, have some information (used to update things)
There are more, but these are the main two that you'll likely use.
As an example let's take a very simple, though also not that useful(sorry Intercom haha pls expand on this one) request you can make to get the total number of conversations you have within your Intercom setup. https://developers.intercom.com/intercom-api-reference/reference/conversation-counts/p>
You need a program like Postman (I recommend this for just testing API requests before you actually implement them somewhere) or just the Zapier web hooks.
Essentially you send a GET request to https://api.intercom.io/countsand it will return you code that looks like this:
{
    "type": "count",
    "conversation": {
        "open": 30,
        "closed": 17,
        "unassigned": 0,
        "assigned": 30
    }
}
The format of this is called JSON, and the reason it's like this is so that it can have nested attributes (like indented) and so that other software can make a distinction between the 'attributes' and the values of those attributes. Essentially so that Zapier can recognize to get the number assigned to 'open' (30 in this case) rather than just the whole text.
Now how does https://api.intercom.io/countsknow to return your intercom data, as opposed to someone elses? Some companies will set up their API so that you would have your distinct ID within the URL itself, like https://api.intercom.io/YOURID/counts.However with Intercom they make it so that the Authorization method is what specifies your identity, so that it can return the data.
The point of advising the above is that, a lot of companies will do different things with their API, but it's all fundamentally the same, and once you understand what is merely just a slight difference in structure, you can easily adapt to using any API.
Now regarding Authorization, API calls will often require this, just like when you have to login to a website. It's up to the owner of the API as to which, if any(it's possible to set up an API to not require any authorization), type of authorization to use. For Intercoms case, they use a Bearer token. It's not really important to understand exactly what that is, just how you specify it in your settings.
-
Okay I could probably go on and on about understanding APIs haha so I'll move on to the steps to get what you need in this case, but happy to clarify any parts!
Step 1. You need to create an 'app' (while this is used for making actual apps in Intercom, it's also just required to make any api calls at all) within the developer hub.
You can click on 'your apps' at the top right and press 'create new' to do so. Call it whatever you like.
Step 2. Once you've made the app, the API version is going to by default be on v2.5. In this case we want to change it to v0, so click on 'API Version' in your app, then edit, then change it to V0.
 Step 3. Click on 'Authentication' below 'API Version' and you'll have your token visible. Copy this, you'll need to use it with Zapier. This is the bearer token.
Step 4. We need to find the subscriptions IDs and I don't think you can find them within Intercom. If you already have them you can skip this step.
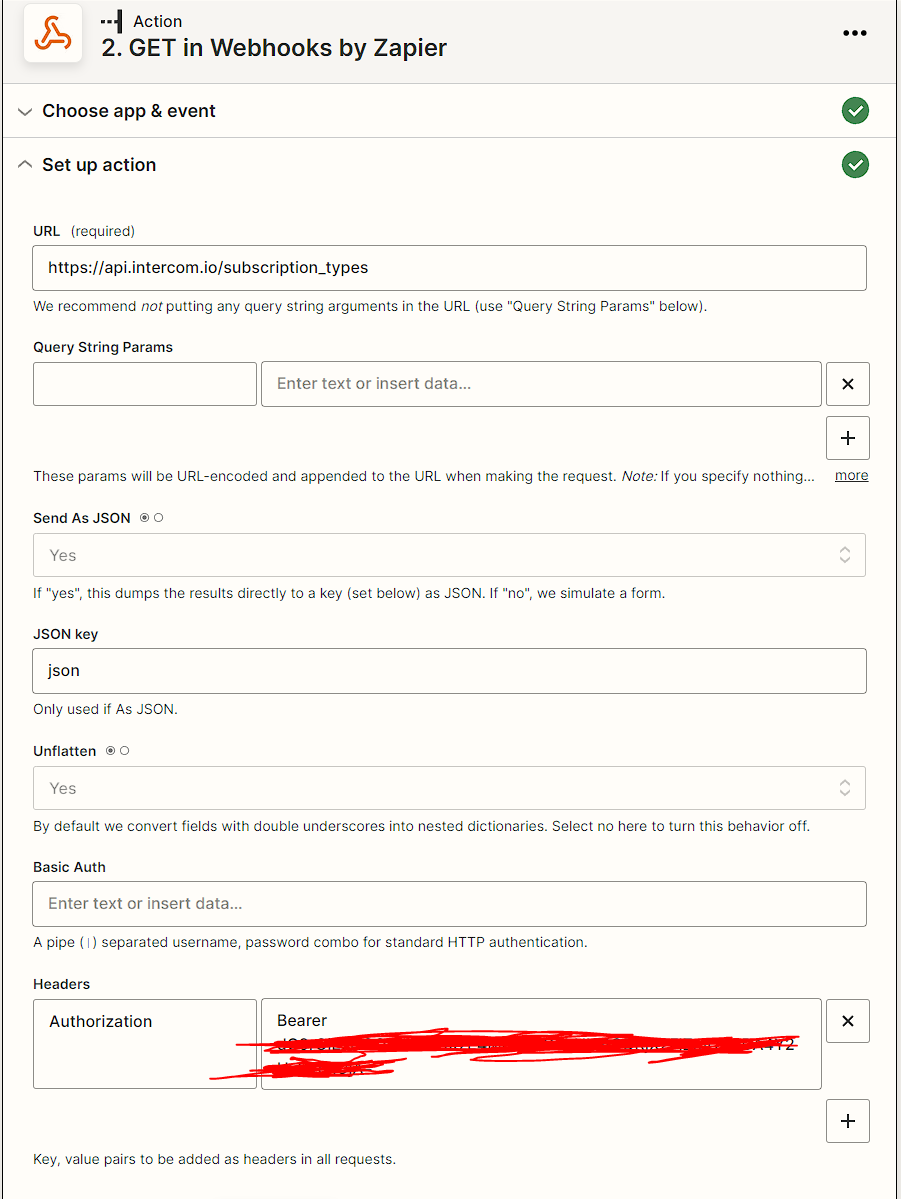
- Head to Zapier and within the webhooks step, select 'GET' request. We're going to use the list subscription request in order to find the IDs of your subscriptions.
- Make yours look like mine does in the photo below. Where it says 'Authorization', you want to enter in the right hand side: Bearer YOURTOKENTHATYOUCOPIEDEARLIER. You will put a space after Bearer, and ensure it has a capital B. If you need to screenshot this later be sure to censor the actual token, as you don't want to share that with anyone(outside your company).
- Press continue and review & test. You'll then get some data back (weew first API call!), and it will list all your subscriptions with the IDs. If you just need 1 ID then you can actually just save the data in a notepad and delete this step.
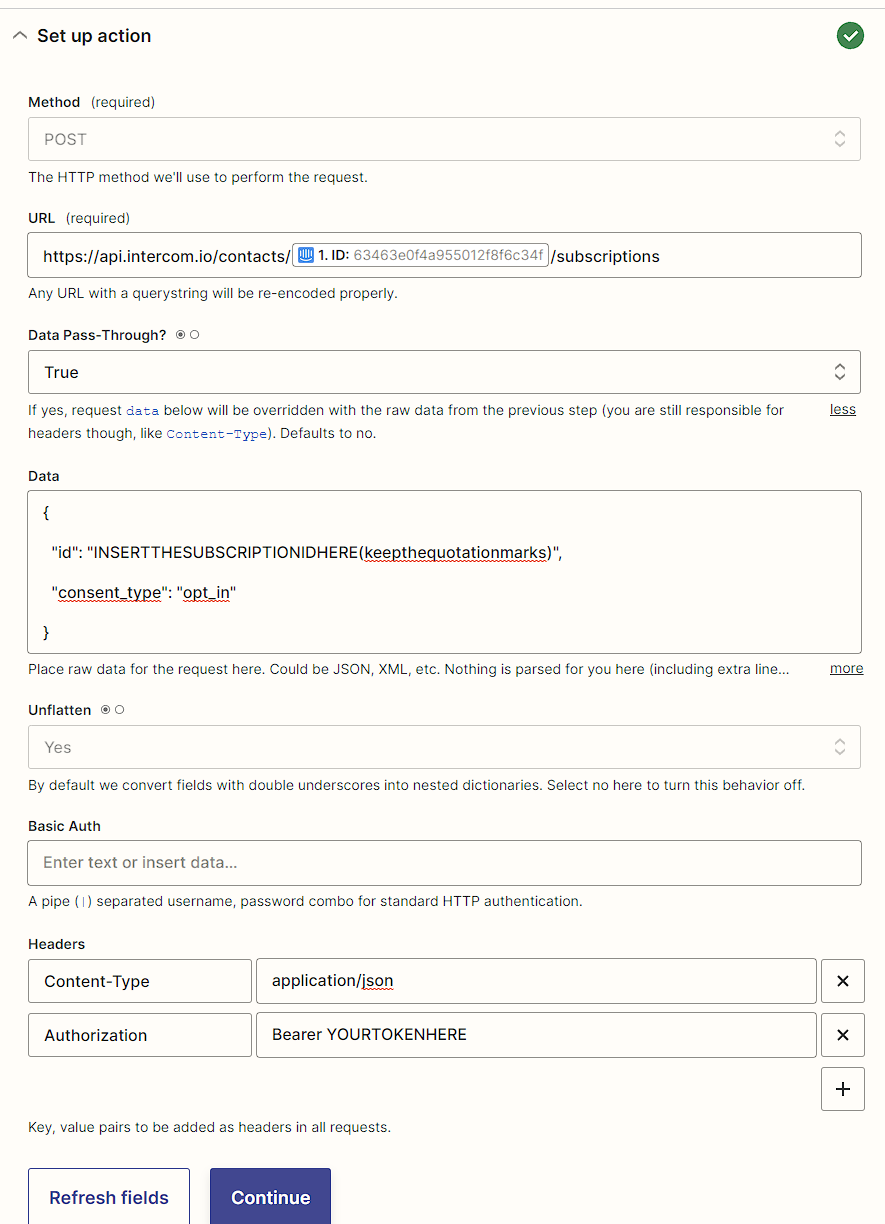
Step 5. Okay so we have the subscription ID that we need for the next API call. So now make a new webhook step (or just edit the one from Step 4 if you don't need it anymore, either way) and select 'CUSTOM' as the option.
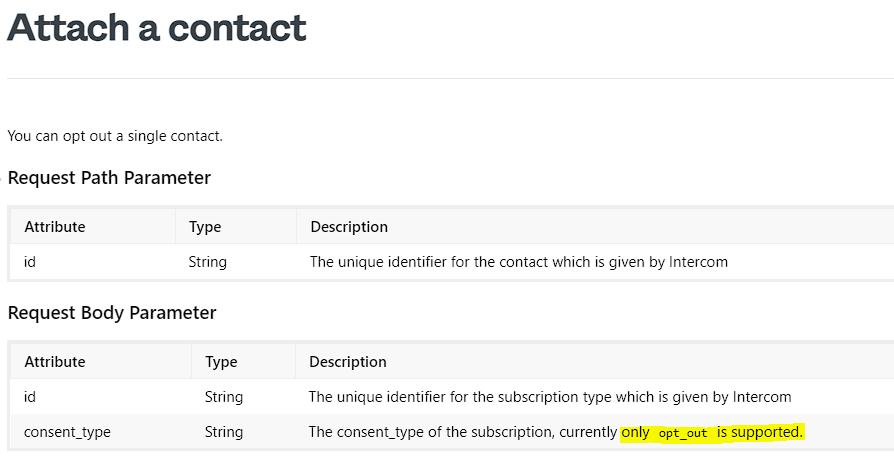
Step 6. Replicate how my photo below looks:
This should work, I say that only as I don't have any subscriptions myself to test but the only way in which it may not work would be me entering something wrong within Zapier, so it'll definitely work either way just may need a tweak, but I think I've got it all right.
As you can see we're dynamically inserting the lead ID into the URL structure. Remember earlier when I said sometimes APIs will have the 'identifier' in the URL and sometimes in the authorization? In this case it has the identifier for the lead in the URL and that of course will automatically update each time it runs for a new lead.
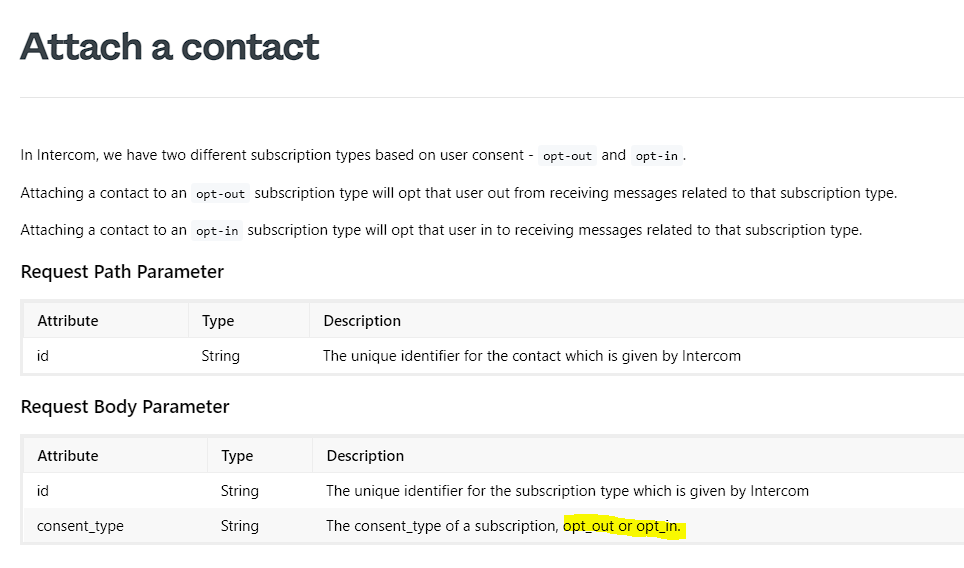
You can of course change the 'opt_in' to 'opt_out' for other types of queries but for now you want opt_in of course.
Give this a go and hopefully this all makes sense! If you get stuck let me know, I'll be here to help :)


 However, the